
Set Voicemail
1. In this tutorial you will learn how to setup and use the voicemail feature that is provided on this call tracking platform. The voicemail feature is commonly used to allow the calling party the ability to leave a voicemail for you when the call receiving party does not answer the call for any reason.
Important Note: The voicemail feature works in tandem with the call recording feature, meaning you must ensure that your telephone number has its call recording feature enabled before you activate the voicemail feature.
To setup the voicemail feature in your account, login to your account using your Administrator’s login credentials.
2. After you have successfully logged into your account, navigate to the left navigation area, and find and click the Numbers link that appears under the Manage menu section.

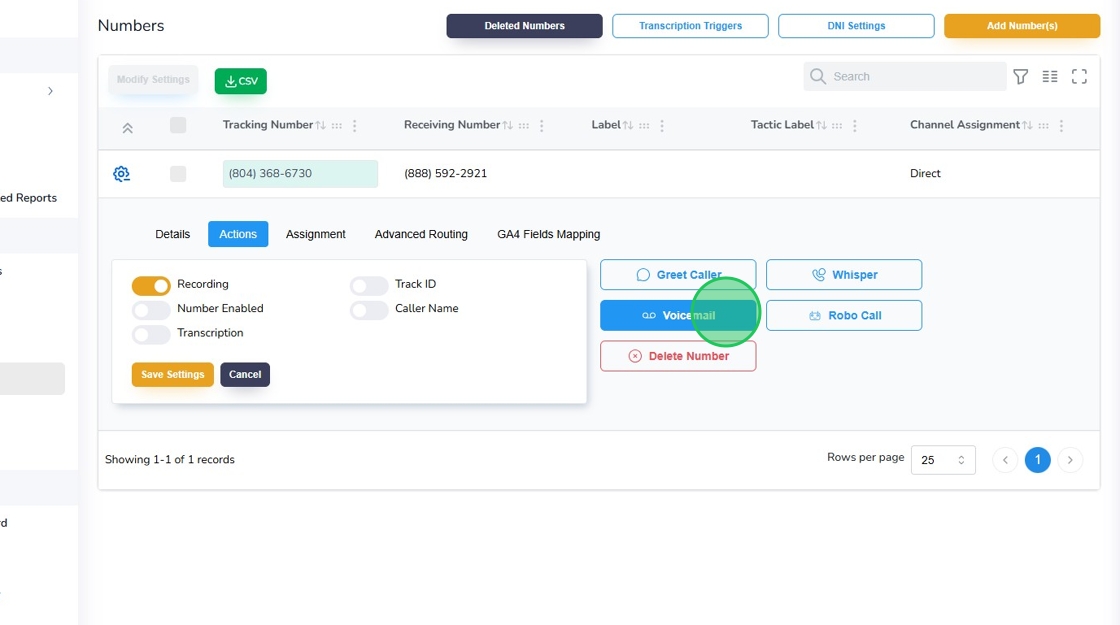
3. Find the telephone number that is to be set up with a voicemail, and then click on the blue gear icon that is adjacent to the telephone number to open that number’s settings.

4. When the number settings menu is displayed, click the “Actions” tab.

5. With the Actions tab open, find and click the “Voicemail” button.
6. Click the Time to Connect to Voicemail Dropdown menu, such that it renders for you the available intervals that you may set for voicemail activation. The interval values are rendered in seconds and constitute the time that you wish the calling party to wait before the voicemail on your phone number is engaged.
Pro Tip 1: If you wish the voicemail feature to be activated after one ring is heard by the calling party , select the shortest duration.
Pro Tip 2: If you would like to provide the calling party a reasonable time interval to connect with you before the platform engages the voicemail feature, then select a time interval between 20 to 30 seconds.

7. After completing the time interval field, navigate to the message field, click the “Message” field and enter a short voicemail greeting which advises the calling party where they have reached and that you are unable to answer their call now. An example of a message would be: Thank you for calling ABC Plumbing. You have reached our voicemail. Please leave your name and a telephone number where you may be reached, and someone from our team will call you back shortly. Thank you. Click the Save button to save your voicemail message. This platform will convert your entered text into an audio format and render it to the calling party.
Pro Tip: Do not use any special characters such as a dash, ! or & in your message as this may break the call forwarding.

8. Optionally, instead of the text to audio format, if you choose to render the voicemail message in your own voice you may do so by first recording your voicemail message in an MP3 format on any suitable audio recording device. After you have created the recording, navigate to the Upload File area and click the Choose File button. Next, find your audio MP3 file located on your computer and select it for upload.

9. Click the “Save” button to save your setting.

10. Click the “OK” button to reconfirm your settings.

11. Click “OK” again to move to the next step.

12. Once you have successfully setup the Voicemail on this platform, you will observe that the Voicemail button’s background will be blue instead of white. A blue background indicates that the Voicemail is activated and functioning. You are now ready to test the work that you have completed. Call the telephone number that has been enabled with the voicemail feature and validate that the voicemail gets activated and performs as per your settings.

13. This completes the tutorial for how to set up Set Voicemail. If you face any difficulty in implementing these instructions or have questions related to this feature, please do not hesitate in emailing support@avidtrak.com