
How to Add the AvidTrak JavaScript to a WordPress Website
1. In this tutorial you will learn how to add the AvidTrak JavaScript to a website that was built using the WordPress content management system. By adding the AvidTrak JavaScript to your Website you will be able to perform dynamic number insertion on the web pages of your website. This guide assumes that you already have necessary access credentials to your website which allow you to make changes to your website. As always, please follow good development practices by ensuring that you have already made a backup copy of your website and that you perform your work in a development and test environment before you go live.
2. Begin by logging into your WordPress Account.

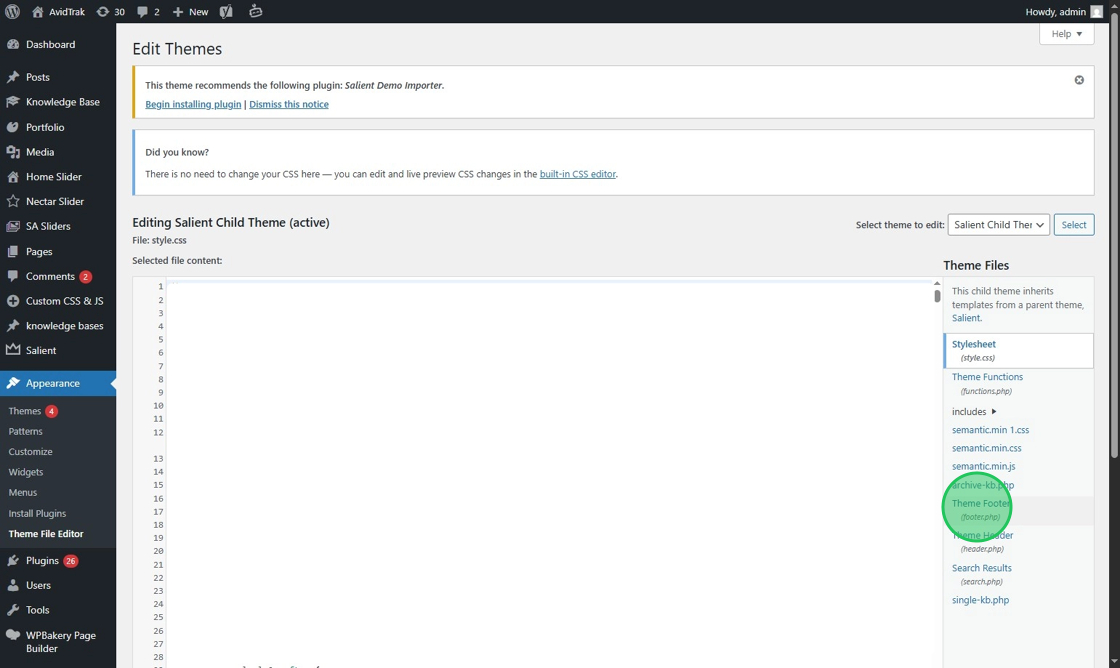
3. After logging into your wordpress account, navigate to the left menu bar and find the Appearance link section. Click the “Theme File Editor” link from the left menu bar.

4. Find and click the “Theme Footer (footer.php)” link under the Theme Files heading.
5. Navigate to the bottom of the screen and find a line that is just above the closing body tag. We will now have to access your AvidTrak account to obtain your account’s JavaScript. Keep the WordPress page open and open a new browser window.

6. Using the new browser window that you opened, login to your AvidTrak account and click the DNI button on the upper right corner of your screen.

7. Click the “Get Tracking Code” link.

8. From the pop-up window, click the “Copy Code” button to copy your account’s JavaScript code. In the next step we will return to the open WordPress page, to paste the copied code.

9. After you return to the WordPress window, paste the code that you copied in the previous step.

10. Click the “Update File” button to save your setting.

11. After completing the JavaScript code installation on your WordPress website, you are now ready to test and validate your work. To perform the validation, return to your AvidTrak account and click the DNI button.

12. Click the “Get Tracking Code” link in the pop up.

13. Find and click the “Validate Tracking Code” tile.

14. In the field labeled “Enter Website URL” enter your website URL. In this example we have entered https://avidtrak.com

15. Click the “Validate” button after entering your website address.

16. Wait for AvidTrak to verify the code installation. You will see the onscreen prompt Verifying the dynamic number insertion (DNI) as AvidTrak performs its code checking functions.

17. If you have done your work correctly and the code has been verified successfully, you will see a checkmark appear under the Status header.

18. This completes the tutorial on how deploy your AvidTrak account’s JavaScript to your WordPress website. If you face any difficulty in implementing these instructions or have questions related to this feature, please do not hesitate to email support@avidtrak.com